

High Wall of Lothric is a Location in Dark Souls 3. After exiting the Cemetery of Ash and once out of the Firelink Shrine, the player arrives at the higher ramparts of Lothric's walls. Plagued by the hollowed and haunted by a fire-breathing wyvern, the area hides away valuable treasure for the observant.

General Information
- Previous: Firelink Shrine
- Next: Undead Settlement, Lothric Castle, Consumed King's Garden
- Recommended Levels: 1- 22
- Bosses: Vordt of the Boreal Valley, Dancer of the Boreal Valley (If you kill Emma or beat 3 Lords of Cinder)
- Bonfires: High Wall of Lothric, Tower on the Wall, Vordt of the Boreal Valley, Dancer of the Boreal Valley
High Wall of Lothric Map


NPCs in the area
- Greirat
- Emma
- Way of Blue Covenant
Bosses
- Vordt of the Boreal Valley
- Dancer of the Boreal Valley (Recommended after defeating the 3rd Lord of Cinder)
Items
Consumables
- 8x Firebomb
- 14x Throwing Knife
- ?x Alluring Skull
- 3x Black Firebomb
- 12x Standard Arrow
- 7x Soul of a Deserted Corpse
- 2x Large Soul of a Deserted Corpse
- 2x Gold Pine Resin
- 2x Undead Hunter Charm
- 4x Green Blossom
- 2x Ember
Multiplayer Items
Weapons & Shields
- Longbow
- Battle Axe (Deep)
- Broadsword
- Rapier
- Mail Breaker
- Lucerne
- Claymore
- Astora Straight Sword
- Silver Eagle Kite Shield
- Club
Drops from enemies
- Lothric Knight Sword (Lothric Knights)
- Lothric Knight Long Spear (Lothric Knights)
- Lothric Knight Shield (Lothric Knights)
- Lothric Knight Greatshield (Lothric Knights)
- Knight's Crossbow (Lothric Knights)
- Light Crossbow (Hollow Soldiers)
- Wooden Shield (Hollow Soldiers)
- Spear (Hollow Soldiers)
- Iron Round Shield (Hollow Soldiers)
- Firebombs (Hollow Soldiers)
- Crystal Gem (Hollow Soldiers)
- Dagger (Hollow Assassins)
- Throwing Knives (Hollow Assassins)
- Greataxe (Large Hollow Soldiers)
- Halberd (Large Hollow Soldiers)
- Winged Knight Halberd (Winged Knight)
Armor
- Deserter Set (drops from hollows wearing it)
- Lothric Knight Set (drops from Lothric Knights)
Upgrade Materials
- 3x Titanite Shard
- 1x Refined Gem
- 1x Estus Shard
Keys & Other
- Dungeon Cell Key
- Binoculars
- Ring of Sacrifice
- Small Lothric Banner
- Cell Key
- Blue Tearstone Ring
- Estus Shard
- Fleshbite Ring+1 (NG+)
- Ring of the Evil Eye+2 (NG++)
Enemies
- Crystal Lizard
- Darkwraith
- Hollow
- Hollow Soldier
- Hollow Assassin
- Large Hollow Soldier
- Lothric Knight
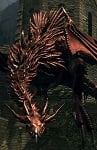
- Lothric Wyvern
- Mimic
- Pus of Man
- Starved hound
- Winged Knight
Notes
- You will return to this area with the Lift Chamber Key as part of Leonard's Quest
Full High Wall of Lothric Walkthrough
Arriving at the High Wall
Upon arriving here from Firelink Shrine, proceed through the doorway and open the double doors.
Go down the stairs and light the bonfire. Looking out from the bonfire you will see a wyvern to your left, attacking it with arrows from here will draw some powerful fire breath in your direction so be warned.
Descend the stairs to the right and defeat the hollows and undead dogs along the walkway here, including the non hostile hollows if you wish. If you go up the stairs on the smaller tower here, you will find several hollows in prayer as well as a crossbow hollow and corpse where you can loot a Longbow and Standard Arrow 12x. Be careful here as the praying hollow closest to them will turn into a Pus of Man if not killed quickly, but if it's beaten after transforming it drops a Titanite Shard and an Ember. It only drops these items once after being killed.
Return to the bonfire and take the other set of stairs to the left that lead down to the second walkway. Defeat the sword wielding hollow, the lantern wielding hollow, and the praying hollows if you wish. If you choose to, go up the stairs to the left of the wyvern head to a platform where you will find an assortment of hollows. Quickly defeat the one with a lantern, for he will cry out for the others to attack you if not dispatched quickly enough. Continue up the stairs to your left to take out the firebomb throwing hollow and other attacking hollows. At the next level you can loot a corpse for the Binoculars. Proceeding back down to the lower level, you can fall down a ledge behind the fallen wyvern and go through a low window where you can loot Gold Pine Resin 2x. Drop down into a room with a lattice floor and a hollow. Defeat him and proceed to the other side of the room where a hollow is waiting in ambush behind the boxes. Loot a corpse behind the table for Firebomb 2x. Descend the ladder into a cell where a corpse here can be looted for a Soul of a Deserted Corpse. Continue through the doorway on your left.
Note: If you have already visited the next platform and the wyvern has already landed, you can use the window in the room with the lattice floor as a farm - if you roll into the nook through which you can see the hollows and wyvern waiting, you can aggro the wyvern so that it will breathe fire, killing the hollows on the platform. They don't award many souls but it is an easy and safe method of early game farming.
There Be Wyvern
Defeat the spear and shield hollow waiting near the staircase. These guys can be tricky, so stay alert. Going up the staircase will alert a Lothric Wyvern that will come crashing into the tower, breathing some very lethal fire. This will kill the hollows along the walkway at the bottom of the stairs. At this point you can take up a safe position on the stairs and start shooting the wyvern with arrows, preferably in the head. It takes patience, but after his health gets to about a quarter (60-70 arrows), he will fly away and you will receive a Large Titanite Shard. He will also relocate to Dragon Barracks after you light that bonfire in Lothric Castle. This will also provide you with the opportunity to pick up the Claymore in the corner of the landing. Alternatively, you can choose to skip this and make a dash for it. Time the fire breathing and make a move to the closed door ahead, if you're feeling brave, you can loot a corpse nearby that is in the fire area for Deserter Trousers. Take the stairs down and approach the chest here, which is actually a Mimic. Defeat the challenging enemy and pick up the Deep Battle Axe before making your way up the ladder. Go through the next gated door where you will encounter a Lothric Knight and other hollows. The Lothric Knight is tough, but make use of your weapon arts to break his guard. Alternatively, you can parry him with relative ease. Loot the corpse to the left for a Soul of a Deserted Corpse. Continue through a doorway, where you will find a corpse on a beam to the right with Firebomb 3x. Go through an open doorway and up the stairs to find a bonfire. In the corner you will find a Titanite Shard 1x.
Wyvern Loot Strategy: Getting this loot is easier than in previous Souls' Games. Your best opportunity is on your first visit to the area, as soon as you step through the door leading to the spear-wielding hollow at the base of the stairs leading up to the wyvern perch. At this point the wyvern hasn't landed yet, and you have a brief window to make a fast run for the claymore at the far end, opposite the wyvern. Dash up the stairs without engaging any enemies, turn left at the top and run straight back to the shiny treasure at the far end. The wyvern may hit you with fire, but it shouldn't kill you at full health. Heal up fast, grab the item, then drop down off the ledge onto the stairs. If the wyvern is already on his perch, this is a bit trickier, but not impossible. Just remember to heal up if you're hit with fire.
Greirat of the Undead Settlement
Make your way back down the stairs and back into the tower area. Defeat the hollow and take the ladder down where a halberd wielding enemy blocks a doorway and another locked door (can be opened later on with Leonhard's questline, which lead to a Red Eye Orb). Defeat the enemy and go through the doorway. Loot the corpse to the right for Throwing Knife 8x, and you will find a sitting hollow enemy in this room. Go through the doorway into the next room to defeat another hollow and loot the corpse here to obtain a Mail Breaker. Go down the stairs here and enter a room with a jail cell holding an NPC. The cell will be locked, and can be opened with the Cell Key, which you will find later in this area. When you return to free Greirat of the Undead Settlement, converse with him. If you accept his request he will give you the Blue Tearstone Ring and ask you to deliver it to Loretta. He will then relocate to the first floor in Firelink Shrine.
Exploring the Rooftops and Buildings
Retrace your steps back up the stairs and up the ladder and exit through an open doorway. Loot the corpse on the right for Soul of a Deserted Corpse 1x. Go up the short stairs to where the hollows are praying and defeat the hollows here who come up the ladder. Descend the ladder and proceed onto the rooftops where you will encounter several hollows in worship. One will erupt into a Pus of Man. The Pus of Man will drop an Ember and Titanite Shard 1x, but only after being killed after the first time. Running up and backstabbing this hollow before it transforms is a viable option. Explore the rooftop here to find a corpse with a Large Soul of Deserted Corpse and a Crystal Lizard behind a lookout.
Down below in the fountain area, you will see a large enemy wielding a huge halberd. He is a tough opponent this early in the game, but he can be safely killed from the rooftop with arrows. About 8 arrows will do the trick, depending on whether you pull off head shots or not.
Proceed forward and take a ladder down. Near where the ladder leaves you off, you can head out onto the roof to find a corpse with Black Firebomb 3x. Enter the open doorway by the ladder and head left into the next room where you will find a hollow waiting. There are several clay pots here that hide a sitting hollow, smash the pots to loot an Undead Hunter Charm 2x. Up the short stairs another hollow with a crossbow will wait in attack. Continue up into the next room where you will find another dagger wielding hollow. Between two chairs loot the corpse for a Titanite Shard 1x.
Proceed back down to where you entered after descending the ladder to take on the spear and shield wielding knight enemy. In the corner you will find a corpse with a Soul of a Deserted Corpse. Continue through the open doorway and onto the walkway to find another hollow enemy in a doorway to your left. Defeat the enemy and enter the room where you can break several boxes to find a Broadsword. Exit this room and make a left out the doorway and down the stairs and enter the doorway here. Continue into the next room where you will find a sitting hollow enemy. Open the chest here to find a Silver Eagle Kite Shield 1x. If you go up the short flight of stairs here and out you will find another hollow enemy and a broken balcony. Go back to where you first entered here and down the stairs you will come to a large room with several hollows and undead dog. In a short alcove here, you can break several boxes to reveal a Titanite Shard 1x. On a table in the room, you can find an Estus Shard 1x. Down the short flight of stairs at the end of the room, you will find an undead dog and a corpse with Cell Key. You may now return to where you found Greirat earlier to free him.
Go back up the stairs and to the walkway where you killed the hollow who was waiting in a doorway. To the left, a hallway is blocked by boxes which can be destroyed. Continue down the hallway and onto the walkway. Follow it to the end where you can loot Green Blossom 2x. Jump down from the walkway to the right, there is a chest containing an Astora Straight Sword.
Retrace your steps back out to where you first came down the ladder after defeating the dark mass erupting enemy and proceed forward to get to a balcony where more hollows await. Loot the corpse hanging over the railing for Firebomb 3x. Take the ladder here down to the balcony where you will encounter a hollow sword enemy and another one who will leap over to engage you.
Fountain of Dead Knights
Proceed through the open archway to a courtyard with a fountain at its center, surrounded by dead soldiers. The area here is patrolled by a large winged knight enemy wielding a massive halberd who can cast a spell that calls down damaging pillars of light. If you didn't kill him from the rooftop as described above, you may be regretting that choice now.
Defeat the knight by carefully engaging it, avoiding its halberd reach and backing off when it casts its spell. Backstabs are a powerful tactic here if you can get behind him. In this courtyard area, there is a sewer pass and at the end you will find a corpse with a Rapier. Be mindful of the hollow that will ambush you here.
You can loot the corpses around the fountain to obtain Ember 2x.
Proceed down and through the archway to the next area filled with fallen and falling leaves. Proceed up the stairs to your right where a crossbow hollow is and enter the archway to find a sword wielding hollow. Go up the stairs to the landing to loot a Large Soul of a Deserted Corpse. You can jump here onto a long awning with a corpse that holds a Ring of Sacrifice 1x. You can drop down here to land back in the courtyard where you fought the winged knight. Retrace your steps and go back up the stairs where the crossbow hollow had been and continue taking the stairs up until you come out to a stone walkway with more dead soldiers and a wandering dagger hollow. Once you near the archway ahead, 4 more hollows will leap out to attack. Defeat them and go through the archway to find a room with a lift.
Step on the pressure plate to take the lift up. At the top you will find Throwing Knife 6x. Open the door here and step out where an axe wielding hollow will wait in ambush. An easy way to kill him is to send the lift back down and then bait him into the tower. Keep the elevator shaft between you and he will fall down it to his death. Another sword wielding hollow will rise outside the tower here. You can loot a Soul of a Deserted Corpse here. Head up the stairs to the walkway, (beware of the dogs) where the gesticulating hollows are and head right down the walkway and up the stairs where you will find the first bonfire again, now having unlocked the shortcut via the lift. Returning to the lower area where the hollows were, you can find Green Blossom 2x to the right of the archway leading back to the falling leaves area.
Return to the area covered in falling leaves, and down into the bridge area to take on the greatshield and spear knight and another sword and shield knight. Across and up the stairs you will encounter another sword and shield knight. Loot the corpse on the balcony near the third knight for the Lucerne.
Emma and the Way of Blue
Proceed into the building and speak to Emma, the High Priestess of Lothric who is seated in a chair at the far end of the room. She will explain to you what you must do and gives you the Small Lothric Banner which you will use to advance to the next area. She will also give you the Way of Blue Covenant parchment which when equipped, will allow you to automatically summon members of the Blue Sentinels to defend you when you are invaded by a hostile phantom. If you kill her here, she will drop an item, which you can bring to the altar behind her to trigger the Dancer of the Boreal Valley boss fight. This boss fight will occur naturally later in the game's progression so there is no immediate need to kill her here and start the fight.
Boss Fight: Vordt of the Boreal Valley
Exit the room from where you entered, and head right up the stairs where a red eye knight waits who is a much tougher fight than the other foes you've faced to this point and will buff his weapon to go with his skilled attacks. Proceed down the stairs away from the room with Emma, dealing with a hollow on the right. Continue through an open double door to enter a large room and approach the double door overgrown with tree branches to trigger the boss fight with Vordt of the Boreal Valley, a somewhat quadrupedal armored foe wielding a massive great hammer and dealing frostbite. (If you've already killed Sword Master Saber, his summon sign will be right in front of the boss area). Killing Vordt will indicate that an heir of fire was destroyed and will earn you the Soul of Boreal Valley Vordt and the Achievement/Trophy Vordt of the Boreal Valley.
Go through the opened double doors to get to a cliff. Display the Small Lothric Banner and a Gargoyle escort will arrive to carry you to the next area, the decaying slum Undead Settlement.
Boss Fight: Dancer of the Boreal Valley
After slaying three of the Lords of Cinder, you will be transported back to the room where you met Emma. She will give you the Basin of Vows and die. Approach the altar behind her corpse to trigger the fight with the Dancer of the Boreal Valley. You may use a Homeward Bone before doing so if you would like to prepare yourself or spend your acquired souls.
You may alternatively trigger this fight very early on by killing Emma after joining the covenant. She will drop Basin of Vows, and if you approach the altar behind her, the boss fight will trigger.
Defeat her to light the bonfire in this room. Approach the altar again and place the Basin of Vows on it, which will trigger a cutscene that lowers a ladder. Ascend the ladder to reach Lothric Castle.

HighWall of Lothric Maps


High Wall of Lothric Video Playthrough
Video Walkthrough:
High Wall Of Lothric Walkthrough
All items in High Wall of Lothric
Speed Run Walkthrough
A fast walkthrough of how to get to the end of the level the fastest, picking up only essential items follows:This level has a few items that even speed-runners will want. From the bonfire, go right and pick up a Longbow if you want it, or bypass this step and go left and up, avoiding the fire-breathing wyvern. You will want to go down a ladder to defeat the mimic downstairs and obtain a Deep Battle Axe, as it's a free infused weapon for early gameplay.
Past the mimic, you will want to follow the natural progression until you find a ladder to some rooftops with a hollow that transforms. Get the Crystal Lizard nearby and then go down the ladder again, you are now at point A in the map.
From point A, look behind you and walk some ramparts forward, past a few items, until you can take a right into a rectangular room. Here you want to pick up the Cell Key and Estus Shard, then go back the way you came to point A.
Continue down the ladder now, and fight a Winged Knight. You can grab the embers in the area and proceed down to a courtyard with several Lothric Knights. To your immediate right, a path leads to an elevator shortcut to Part 1 of the map. Down and left, you can go into the cathedral to meet Emma and obtain the Way of Blue covenant and the flag to access the next area. Once ready, head towards the boss room and fight Vordtr of the Boreal Valley, and then use the flag to proceed to the Undead Settlement.
You can return to the higher area to free Greirat of the Undead Settlement and have him join you at Firelink Shrine.
Speedrun Video Walkthrough:
Trivia:
- This level was use as an online stress test, and then as demo for gaming convention (with online disable this time). It was almost the same place, only the player could not reach the stairs which lead to Vordt and could only fight against the Dancer. Emma was absent too with her Basin of Vows. In order to fight againt the Dancer, the player only needed to loot a consumable soul on a corpse.
 Anonymous
Absolute twink city but it goes both ways. You'll get invaded by twinks basically instantly if you're embered but a lot of the summons are absolutely jacked up as well. One dude 4 shot Vordt for me and dropped a soul of a great hero after.
- Anonymous
- Anonymous
I just visit this Area, after I cleared the Grand Archives, to kill the Wyvern. But he's gone... I have ignored him on this run. So why is he gone? Or is he one of the twin Wyverns at the gate before Lothric Castle?
Well either way, I will not get the large shard.
- Anonymous
- Anonymous
- Anonymous
" Invaded by dark spirit TwinkMaster69 "
Full Havel's, dark hand and all +3 rings.. Fun times
- Anonymous
I still hate that this guide doesn't point that the Astora straight sword is in the room with the Kite shield, if you drop down near the chest, and that you can kill the big group of hollows near the cell key by hitting them from that balcony with firebombs. That passageway with these enemies and the Shield knight killed me almost as much as Nameless and Gael combined on my first playthrough and I nearly quit because of it. This is by far the hardest starting area in any of the souls games imo, so it sucks the guide isn't as good as it is in some of the other areas. I recommend watching outsideXtras souls academy series if you want some great tips for this area
- Anonymous
i remember my first encounter with the pus of man where the longbow is, was like WTF is that! later i kill it before the transformation and was shocked by how easy is to kill them before they turn into that big ass monstruosity
- Anonymous
One of the harder starting areas in a game, IMO. Especially if you're new to Souls games. Too many threats a beginner might not be able to handle that well like the Pus of Man, Lothric Knights, Wyvern, Winged Knight. Good place to get all the training wheels off for sure.
- Anonymous
the only real threat on the wall is getting invaded or maybe the wyvern
Anyway play the game with out triggering the dragon to come to high wall?
- Anonymous
You can’t be invaded while solo in this area on new game, you need to summon players in or use the dried finger. Compare that to DS1 invaders who give new players a horrible first impression of the game as soon as they kindle the burg bonfire and yet people still frown upon low level invaders in DS3. It’s pretty silly guys.
I'm not sure what arrows you were using when testing this but 99 wooden arrows using the long bow averaging 20 damage per arrow with a few hitting for 3 damage and some hitting for 35+ totaling 1880 damage was not enough to make the wyvern go away. Maybe share the arrow type, the stats required to do this and whether or not the bow you were using was upgraded. I just spent two levels worth on my new character to kill this dragon and it ain't dead. I don't care, at least not for my own sake. I just prefer having and being presented with accurate information.
- Anonymous
in case any of you is struggling here, first kill these "praying" hollows for souls, if you have enough souls go back to the firelink shrine and level up stats[high vigor at start helps] The more you repeat it, the more op you will get.
but still you need to Git gud as if you farm enough for 99 all stats you will get matched with people that has stronger stuff than you.
level 30 is fine but don't go to the max sl [802] as the matchmaking will put you with invaders that has 10 times stronger armor than you.
doing it is fine because you will get op phantoms[not every time] The end.
- Anonymous
- Anonymous
No one's gonna mention that you can get the dark set and dark sword from the darkwraith in the cell under the Tower on the Wall bonfire?
- Anonymous
Not sure if previously mentioned, but you can net the Large Titanite Shard from the dragon as a Sorcerer. Position yourself on the stairs outside the door that is locked from the other side, the one that leads to the mimic. Using the binoculars, snipe the wing that hangs over you. At SL17, 27 INT, Sorcerer’s Staff +1, it only took about 20 or less shots. Is it optimal? No, but it’s doable if you’re going for a pure Sorcerer run. Again, sorry if this was mentioned before.
- Anonymous
I invade this area at level 6. Pick deprived, progress to the undead settlement, draw out your 5 levels with Yoel and purchase the dark hand from Yuria and you’re good to invade with a strong non twink non password gear trading character. You’ll invade all starting classes excluding deprived (unless they level) as the lowest is SL 5. As for armour there are plenty of defence heavy and poise heavy sets available this early such as knight and lothric knight. It’s not a perfect setup but it’s incredibly easy to make, has a high success rate and does not require aid from another player.
- Anonymous
This wiki is STILL missing the Winged Knight Halberd as a loot drop.
- Anonymous
So are there any consequences to killing the Dancer early in regards to any NPC quests?
- Anonymous
- Anonymous
the deserter trousers "loot" came from an enemy, it wasn't placed there on purpose. not real loot
- Anonymous
Good Ol'High Wall of Lothric, still getting Low Level invaded cause my buddy wants to run through the game again an forgets you will run into people that both Beat ya in Skill an Gear lol =u= This game is what I imagine an abusive relationship feels like.
- Anonymous
The NPC summon Lion Heart Albert can also be summoned at the top of the stairs that lead into the area with the Lothric Knights before the Vordt fight.
- Anonymous
It would have been so cool if the original DS3 ideas were more prominent in the game. I would have loved to learn more about Pus of Man, hollows turning into trees, and Winged Knights. There should have been more about Lothric, Sullivan, and Yhorm, but sadly the game drowned in DS1 throwbacks
- Anonymous
It is possible to loot a winged knight halberd from the single enemy patrolling the fountain area.
- Anonymous
- Anonymous
"a Gargoyle escort". they're not gargoyles. they're imps, like the enemies from dark souls 1
- Anonymous
Fleshbite Ring +1 can be found on a seperate rooftop after the second Pus of Man!
- Anonymous
- Anonymous
Game goes on sale and all the Low Level invaders come out the wood work to be dickheads, god this is just Wondeful
- Anonymous
What is the desired level to beat High wall of Lothric? Also How do you beat the guy with the Katana outside the fire shrine?
- Anonymous
The links to the map are broken. I wanted to edit to fix, but I lack privileges as a guest. The images of the maps are there, but the link is wrong. There is a slash-quote (/") in the url that shouldn't be there. Should be an easy fix for someone with the privileges. Clicking the maps now leads to an empty tab.
- Anonymous
There is missing information regarding the darkwraith below the escalator. It is underneath the second bonfire behind a door that is opened by the lift chamber key
- Anonymous
You can easyly kill the halbeard hollow by throwing a firebomb thru a hole in the planks above him
- Anonymous
You can trigger the Dancer boss fight before killing Aldrich if you kill Emma and then approach the statue where you would place the Basin Of Vows
- Anonymous
- Anonymous
I just shot 99 arrows at the wyvern and it was below quarter life and never flew away.
- Anonymous
"if you're feeling brave, you can loot a corpse nearby that is in the fire area for Deserter Trousers" This is false. The item dropped from a killed Hollow, but it does not appear in the map like it is said.
- Anonymous
Another early game farming method is from the tower on the wall bonfire, run down the stairs, let the Knight walk out of the door, kill the knife thrower straight ahead, then step a ways outside of the door and shoot 2 arrows into the Wyvrn, or 1 arrow using the bows Puncture skill, and it'll breathe fire which should kill the Lothric Knight as well. Run back up to the bonfire and repeat.
This method costs 5 souls per loop if using Puncture skill, or 10 souls per cycle for 2 normally shot arrows.
This method might actually net more souls per hour than the previous method, around 37,000, probably depending on if you're running the previous method with a +3 Raw Astora Sword one-shotting everyone or not. This method is certainly easier.
- Anonymous
Early Game Farming Method:
You can get to level 30 pretty easily, as well as get the 20,000 for the tower key in firelink so you can get the silver serpent ring before farming. We'll also attempt to get the Symbol of Avarice before farming.
Its best to start the game with the rusted gold coin gift to attempt the Symbol of Avarice here which greatly increases farming.
Grab the bow: From the first bonfire, facing the building, run to your left and kill the archer, then down the stairs here and clear the area of all enemies that agro you. Run across the courtyard and up the stairs and kill the worshipping undead with the smoothest tannest skin next to the archer before he turns to pus of man. Grab the bow off the corpse here and return to the first bonfire.
From the first bonfire, facing the building, run down the stairs to your right. Kill the sword-weilding undead to your right, run forward down the stairs and kill the undead with the lamp, jump down the hole onto the table then drop to the ground. Exit the room and run up the stairs and forward into the room, running past all enemies and getting into the room before the Wyvrn lands on the roof. Kill the enemies that can enter the room after you and the enemies in this room. Go out the side exit, up the stairs and light the second bonfire.
Don't kill the Mimic or the Wyvrn. Go back into the room below the second bonfire, run down a level kill the enemies and exit to the rooftop area. Kill the armed undead. You can then try to run to the far rooftop with all the worshipping undead and kill the one that spawns into a pus of man, or just use the bow to aggro and kill him before or after he spawns. Kill the crystal lizard, descend the ladder, go in the first room on your left, go up into the following room and grab the Undead Huntsman Charm x2.
Run back to the room with the Mimic, throw an Undead Huntsman charm and grab the Axe of the Deep. Run back to the 2nd bonfire and rest. You can now copy your game save data to use if you don't get the Symbol of Avarice.
Return to the mimic, use your Rusted Gold Coin. Throw your last Undead Huntsmans Charm at the Mimic and hope it drops the Symbol of Avarice. If it did, congrats, if it didn't, replace your game save data and try again with the coin and the charm until you do, if you do.
You can now farn for your first 20,000 souls.
From the first bonfire, facing the building, run down the stairs to your right. Kill the every undead you come across, let the undead with the lamp sound the alarm. Clear the entire courtyard. Run up the stairs and sprint to the undead with the lamp and kill him. Walk to the wall and get as close to the Wyvern as you can and he'll breathe fire clearing the area below. Turn around and kill the sleeping undeead behind you. Return to the wall and aggro the fire breath again to be sure everyone below is dead. Run up the stairs and kill the undead on top. clear any left over undead below, then go down stairs and down again into the room below. Clear this room, jump down to the table and the floor below, run forward and exit. Run straight for the first archer and take him out. Kill the undead with the spear and shield. Wait for the Wyvrn to kill every undead that walks down the stairs to the alley. Run back to the first bonfire.
Repeat until you get your first 20,000 souls, then buy the key from the merchant at the home fire and unlock the tower. Go get the silver serpent ring.
Go back and continue the farming run until you get the level you want. You can then send the Wyvrn away with arrows, if you like.
- Anonymous
- Anonymous
- Anonymous
Is it posible to get rid of the blinding lights in the background
- Anonymous
You can also summon Lion Knight Albert for the boss fight. His summon sign is to left when entering from fountain area.
- Anonymous
- Anonymous
A few things are missing in this category. I can think of the Longsword and the Broken Straight Sword, both of which drop from hollows wielding them.
Just wondering if there is an item description explaining the hollow trees dotting the map. I find them and the black abyss mass erupting from hollows very strange.
Missing him with drastically impact your playthrough and what you can purchase at Firelink.
- Anonymous
in the Cathedral where you find Emma and fight the Dancer of the Boreal Valley, the stage can be set ablaze by a fire weapon.Usualy the Dancer and her fire attacks can set the entire boss arena on fire but during and after you can do it yourself too.
- Anonymous
I got far enough to make the High Wall area look dark and have orange skies; and it seems like my summon sign just isn't showing up in my friend's world (who's just started the game) despite the fact that we put in matching passwords.Can anyone confirm that summons between early and late game players aren't possible in this case???
- Anonymous
It will NOT initiate the boss fight if you speak to her, you must go to the statue behind her and approach it to activate the boss fight.
- Anonymous
***** them all 1st they scared me half to death becuase i dont know if they are dead and now i find out an actual dragon shows up
- Anonymous
In my first play through the Astoria Straight Sword was not in the place listed on this map. Instead, the stamina regen grass was in its place.Did anyone else find this to be the case?
- Anonymous
From the first bonfire, go down the stairs toward the dragon bridge, kill the guy who attacks, and then kill the screamer guy walking up the stairs toward you before screams for help. Then, go down the stairs, clear out the little room and stand in front of the cage/gate facing the bridge with the dragon. If you stand close enough, you'll trigger the dragon's fire, killing everything on the other side of the cage, and netting you all their souls. Go back toward the bonfire, and kill any remaining passive worshiper guys. Rest at the bonfire and repeat. You can easily get several thousand souls in a short time and easily get up toward level 20...or buy everything the merch lady has... before you get bored out of your mind..
- Anonymous
Exploring the Rooftops and Buildingsthis part:Go back up the stairs and to the walkway where you killed the hollow who was waiting in a doorway. To the left, a hallway is blocked by boxes which can be destroyed. Continue down the hallway and onto the walkway. Follow it to the end where you can loot Green Blossom 2x.-after that you can just jump down and there is a chest with the Astora sword
Around the fountain, there is a shallow trough with stairs on both ends. If you go through the trough, the enemy will follow you. You can then hurry and double back, land behind him and score a couple of easy hits. Rinse and repeat for an easy win. He CAN hit you from the trough even if you stand above, but those hits are very easy to avoid,
- Anonymous
You can Summon Sword Master Saber to fight the first boss here, his summon sign is to the immediate right of the door.
- Anonymous
Up where the third knight is (near Emma), there's a lucerne in the middle of his patrol route.
- Anonymous
After the fountain, up the stairs past the crossbow hollow, and up once more on the path to the elevator. Green Blossom x2 to left of arch you just came through.
- Anonymous
Don't see any mention of the Astora long sword, In the area above the fountain, with three enemies and a hound, there is a ledge above them with a chest. to reach it, once you enter the area using the ladder, fight past the halberd wielding knight, and before entering turn right, break the barrels, continue round and drop down to the ledge below.
- Anonymous
I don't know exactly what happened but when I first encountered the first Mimic in the area, I first climed the ladder and shot it with Arrows. However, it sprinted straight underneath me. I thought I could defeat it so I went down and ...nope! So I tried again, this time without arrows. Nope again. Tried a third time and with arrows again, went straight underneath again. So I jumped to the other platform to shoot arrows from there but it was gone! So I went up the doorway and got killed by that skilled knight. Coming back the Mimic chest was no longer there and left an item. It was pretty late in the evening so I can't remember what it was but it looked important. Can someone else confirm?
- Anonymous
Are there any known illusory walls? I've seen a few notes with high approvals in this area but I can't seem to get past the walls where the notes are. Or are these just trolls?
- Anonymous
The dragon seems to give you a Large Titanite Shard when you kill it, I didn't find anything different after I killed it by shooting ~70 arrows at its arm.
- Anonymous
Can we summon from the beginning of the map like in the network stress test?
- Anonymous
Soooo how do I open the locked door under the second bonfire?
If u get the wyvern low enough on health using a bow it'll drop a large titanite shard
2
+10
-1