

Crystal Lizard |
|||
|---|---|---|---|
| |
|||
| General Info | |||
| |
|||
| 63-373 | 0 | All Locations | |
| Drops | Various Ores | ||
| Defenses | |||
| Enemy Type | N/A | ||
| Weak | |||
| Resistant | |||
| Immune | All Status Effects | ||
 |
Alluring Skull does not attract this enemy, making it ineffective. | ||
 |
Rapport does not charm this enemy, making it ineffective. | ||

Crystal Lizard is an Enemy in Dark Souls 3.
Crystal Lizard Background
This curious beast will be seen scurrying across Lothric, noticeable most by its carapace ornated with a glowing gem. Upon death, it becomes possible to extract this ore, used as part of a rare weapon refinement and upgrade process. As a result, these lizards are avidly chased despite often appearing in hard-to-reach places.
They will disappear if not killed quickly. Once killed, the item will be directly deposited into a player's inventory, which means the ore won't be lost on the accidental death of the creature (like falls). Lastly, if one does get away, a reload will respawn it.
Crystal Lizard Combat Information
- These lizards must be killed quickly or they will disappear.
- It is not difficult to kill them, and as long as they are attacked they will not disappear.
- It is preferred to just attack them with a melee weapon.
- One easy way to kill them is to jump attack, they'll fall on their back and be flail around harmlessly for a couple of seconds.
- Heavier weapons will make them fall on their back, which makes them easier to hit afterward.
Crystal Lizard Notes & Trivia
- Does not respawn.
- Materials are dropped automatically into the player's inventory.
Crystal Lizard Locations
Firelink Shrine (x1) |
|||
| Location | Directions | Drops | |
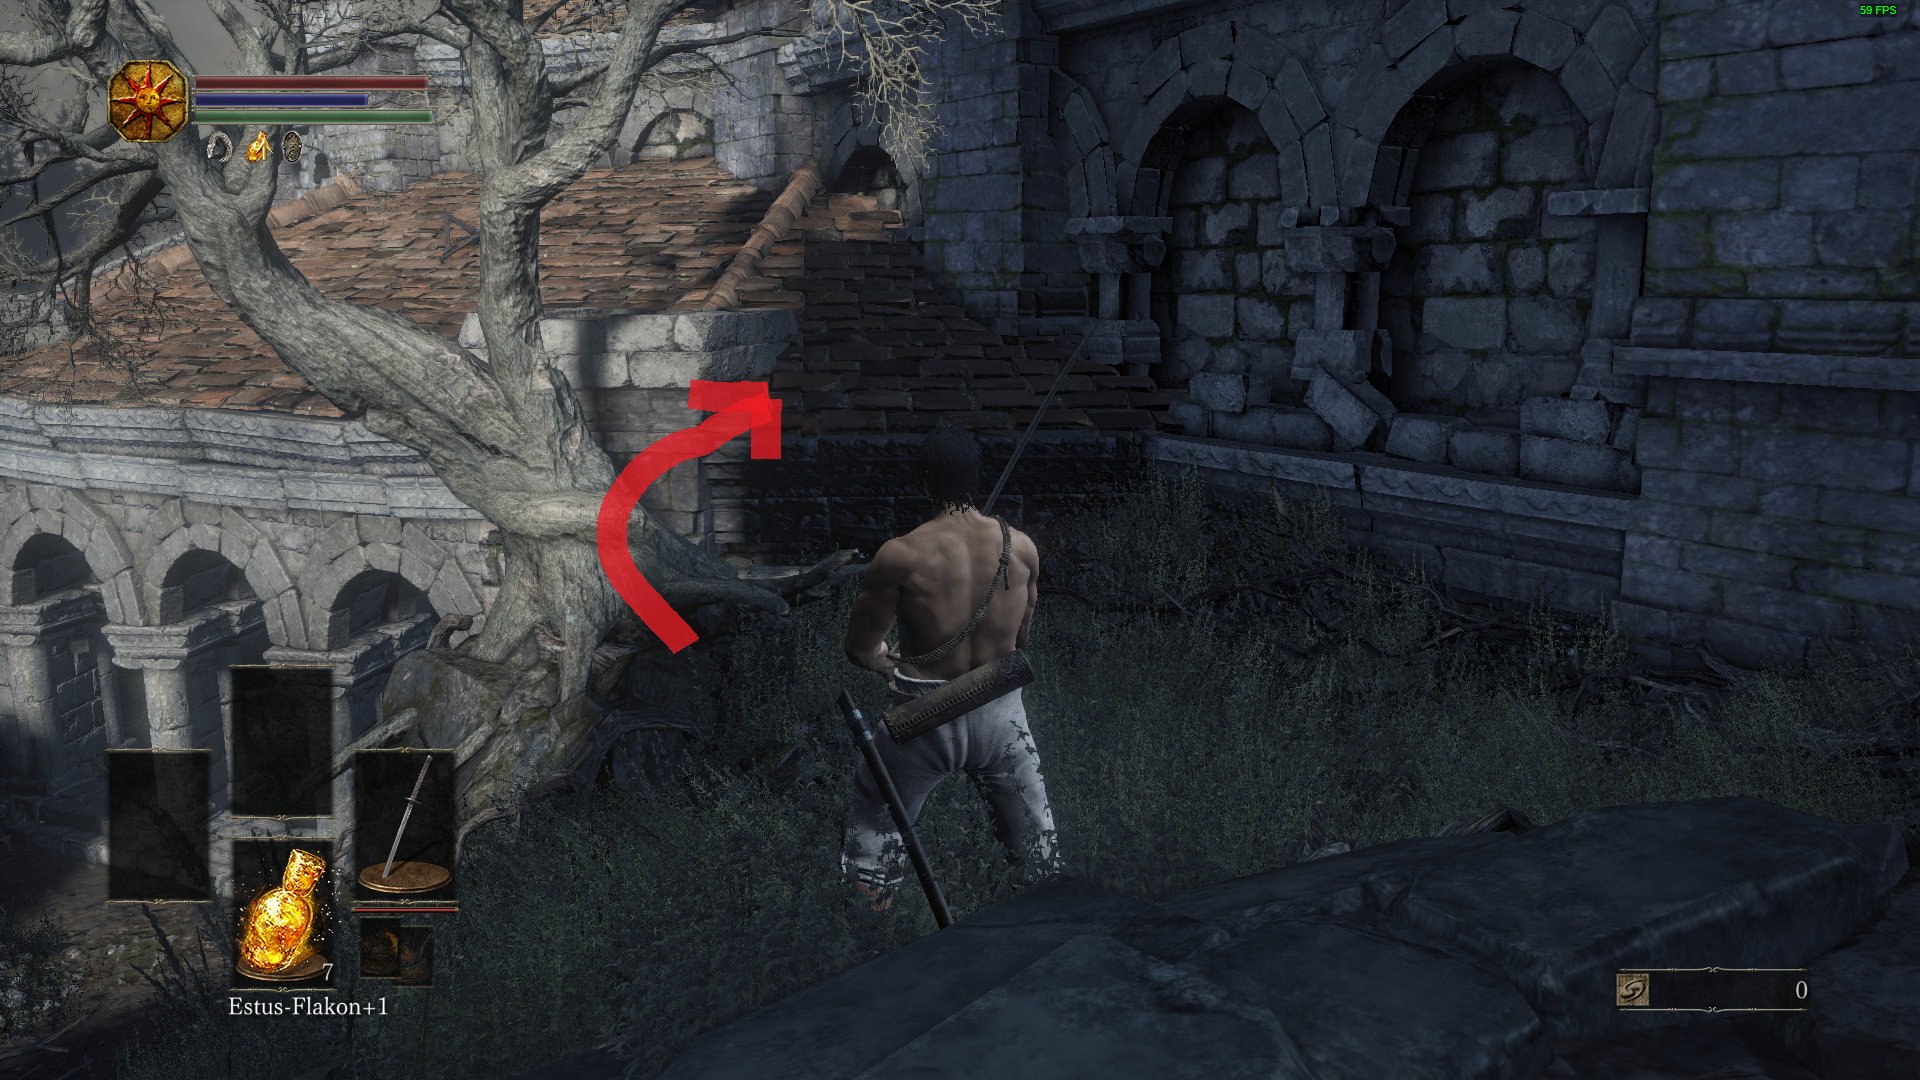
| Outside behind Firelink Shrine | There are two ways to get to this lizard: Purchase the Tower Key from the Shrine Handmaid for 20,000 souls to unlock the Tower Door, then drop down from the first bridge onto the roof. Turn around and you can find the lizard on the ground behind the building. Alternatively, you can climb the roof via the tipped tree shown in this screenshot, then circle around the roof to reach the back. You will pass by the Sword Master along the way. |
63 |
|
High Wall of Lothric (x1) |
|||
| Location | Directions | Drops | |
| Just beyond a Pus of Man on a rooftop | From the Tower on the Wall bonfire, run down the stairs and drop down to the same level as the two Hollow Assassins. Run out the door and you will be greeted by a Hollow Soldier climbing the ledge to your right, and another climbing the ladder in front of you. Drop down the ladder, and you can find the Pus of Man located within a group of Hollows. If you circle around him to the left, you can find the crystal lizard hiding behind the dormer. | 70 |
Raw Gem x1 |
Undead Settlement (x2) |
|||
| Location | Directions | Drops | |
| Near the Dilapidated Bridge bonfire. | From the Dilapidated Bridge bonfire, move forward towards the Hollow Manservant. When you pass underneath the broken archway, make a sharp left and go up the pathway towards the house. Instead of going inside the house, go down the path to the left of the doorway. The lizard will be sitting on the wooden platforms. | 79 |
Sharp Gem x1 |
| At the bottom of the chasm before reaching Irina of Carim. | There are two ways to reach this lizard: Purchase the Grave Key from the Shrine Handmaid for 1,500 souls to unlock the door near the large Hound-Rat in the sewers. Follow the path until you exit into a muddy chasm. To your right is the lizard. Alternatively, you can also drop down from the short bridge where two Hollow Manservants will throw their bowls at you; though it's recommended to equip the Silvercat Ring to ensure the survival of the fall. |
79 |
Heavy Gem x1 |
Road of Sacrifices (x3) |
|||
| Location | Directions | Drops | |
| In a corridor inside the keep ruins that is a few rooms before the Crystal Sage. | From the Crucifixion Woods bonfire, look for the small staircase in the distance that's slightly to your right when you spawn in (not the one where the Exile NPCs are). Drop down into the water and head towards that staircase, then head left into the ruins. Go straight across the room, and you will find the lizard here in the long corridor. | 97 |
Crystal Gem x1 |
| On a ledge just beyond the Crystal Sage boss arena heading towards the Cathedral of the Deep. | From the Crystal Sage bonfire, head out the door on the left. You will not need to travel far to find the lizard on a ledge below you to your left. | 97 |
|
| Near the second crystal lizard of this region, but on a lower ledge. | From the lizard mentioned above, drop down and make a right. The crystal lizard will be right in front of you. | 97 |
|
Cathedral of the Deep (x2) |
|||
| Location | Directions | Drops | |
| Near a sleeping Ravenous Crystal Lizard. | From the Cleansing Chapel bonfire, head towards the cemetery, but make a right where there are four Hollows surrounding an Estus Shard. Follow the path until you find a Corpse Grub patrolling and guarding a pathway. Instead of taking that path, which leads to two more Corpse Grubs, take a right and go up the ramp. Follow the path until you see a bed of crystals in the distance. The bed here is where you will find the sleeping Ravenous Crystal Lizard. You can either fight the beast or sneak past it, but the smaller crystal lizard will be further along to the left of it. | 100 |
|
| Just beyond the first lizard of this region. | From the first crystal lizard, keep going straight and make your way around the chapel annex. The lizard will be out in the open. | 100 |
|
Farron Keep (x4) |
|||
| Location | Directions | Drops | |
| Near the Old Wolf of Farron bonfire, close to the illusory wall hiding the Dreamchaser's Ashes. | From the Old Wolf of Farron bonfire, go out the door and make a left. Follow the path and you will find the crystal lizard. | 117 |
|
| In an open area near a dead wyvern opposite to the Stray Demon. | From the Old Wolf of Farron bonfire, turn around and take the lift up to the next floor. Travel up the staircase, and instead of going towards the Stray Demon, make a right. Find a broken part of the railing near the corner, and drop onto the platform below. Continue following the pathway, and the lizard can be found out in the open. | 117 |
|
| In the same area as the one mentioned above, but closer to the dead wyvern. | -- | 117 |
|
| In the same general area as the last two mentioned above, but higher up on debris. | From either of the crystal lizards in this area, turn around and go up the debris that eventually leads to a staircase on the right. The lizard can be spotted at the base of the stairs. | 117 |
Heavy Gem x1 |
Catacombs of Carthus (x2) |
|||
| Location | Directions | Drops | |
| Just beyond the first spot, you'd find Anri of Astora in this location. | From the Abyss Watchers bonfire, progress until you come upon two Gravewarden Skeletons wielding Carthus Curved Greatswords. There will be two doorways here: one leading to a large staircase and another leading to a corridor. Head down the corridor, but be wary of the large number of Skeletons waiting to ambush you. Proceed down the path, and you'll eventually run into Anri. Further along is the crystal lizard. | 134 |
|
| In a passageway before reaching the bridge that leads to High Lord Wolnir. | From the Catacombs of Carthus bonfire, take a left on the path the Boulder o' Bones rolls on, and take another left after reaching the bottom of the staircase. Mind the Hound-Rats and Carthus Swordman as you make your way down the hallway, then turn right into the cavernous passageway. The crystal lizard is halfway down this path. | 134 |
Fire Gem x1 |
Smouldering Lake (x3) |
|||
| Location | Directions | Drops | |
| In a small cave that leads to Horace the Hushed. | From the Abandoned Tomb bonfire, head out towards the lake and hug the right wall. You will eventually find a small cave entrance marked by candles, which will lead to Horace the Hushed. Two lizards are found in this passage before him. | 171 |
|
| In the same passageway as the first lizard of this location. | -- | 171 |
|
| In a corridor past the Old King's Antechamber bonfire. | There are two ways to reach this lizard: From the Old King's Antechamber bonfire, enter the nearest hallway that's guarded by a Smouldering Ghru and take a right. Follow the corridor to find the lizard at the very end. The other method involves the use of the Avelyn-like ballista. You can lead it to destroy a stone floor area near the center of the lake. Look for lit candles atop two pedestals to find the breakable floor. Once destroyed, drop inside to land in the same corridor mentioned earlier. The lizard will not be far. |
171 |
Chaos Gem x1 |
Irithyll of the Boreal Valley (x5) |
|||
| Location | Directions | Drops | |
| On a small terrace beyond the second Fire Witch. | From the Central Irithyll bonfire, progress forward until you can see two Fire Witches: One walking with a group of Irithyllian Slaves and one on a high ledge. Take care of getting through the plaza, but keep going straight. Once the pathway starts to bend to the right, look to the left for a small, lifted terrace. The crystal lizard will be waiting there. On the other hand, you can come from the Church of Yorshka bonfire. Make your way to the main road, turn right, and you'll be able to see the crystal lizard in the distance on the terrace. Be wary of the two Pontiff Knights walking down the road. |
164 |
|
| Behind an illusory wall found right before the lake surrounding the city. | From the Church of Yorshka bonfire, take the path down the stairs that leads to a cemetery. Lean left and continue down the flights of stairs to reach a darkened building. Mind the many Irithyllian Slaves lurking about, but go straight out the door on the other side of the building. Go down one more flight of stairs, and take the right before entering the lake. The crystal lizard will be hiding behind an illusory wall in the first alcove. |
164 |
|
| Right after the Pontiff Sulyvahn boss arena in a small courtyard. | Note: Must have beaten Pontiff Sulyvahn to reach this lizard. From the Pontiff Sulyvahn bonfire, exit the cathedral through the back, and make note of the two crystal lizards here in the courtyard. |
164 |
|
| Same location as the lizard mentioned just earlier. | Note: Must have beaten Pontiff Sulyvahn to reach this lizard. |
164 |
|
| On the upper levels of Pontiff Sulyvahn's cathedral. | Note: Must have beaten Pontiff Sulyvahn to reach this lizard. If you've unlocked the elevator to the second floor of Pontiff Sulyvahn's cathedral, then simply take the elevator up and make a right. Follow the path and the crystal lizard will be just around the corner. Otherwise, exit the cathedral through the back from Pontiff Sulyvahn's bonfire, and proceed onward until you reach a large courtyard full of Giant Slaves laying about. Head towards the left side of the courtyard to the arcade, and search for the door that leads to a staircase. Travel up the staircase, turn around, and head for the door that will take you back into the cathedral. Take an immediate left once inside, and follow the path to find the crystal lizard around the corner. |
164 |
Simple Gem x1 |
Irithyll Dungeon (x2) |
|||
| Location | Directions | Drops | |
| At the ground level of the west wing in front of a couple of cells holding Wretches. | From the Irithyll Dungeon bonfire, proceed onward until you're on the same side of the building as the squealing, docile Wretch. Upon exiting the room it's in, you can turn left and drop down onto the lower level or take the stairs to your right. Mind the three Jailers and two Cage Spiders as you make your way down the stairs. Once you get to the lower level, look down the corridor to your left and the crystal lizard will be visible in the distance. Proceed with caution, as one of the Wretches to the left will attempt to hinder you as you chase. | 169 |
|
| In the second building on the same ledge, a sleeping Giant Slave is resting on. | Continuing from the first lizard of this region, proceed until you enter a large hallway with enemies pouring in from the other end. You have two options: You can fight through the enemies and locate the ladder on the opposite end, or you can drop through the first window directly to your right. In either case, the lizard will be right next to the Giant Slave's arm. Proceed with caution, as chasing after the lizard may wake up the giant. Projectiles are recommended for this. |
169 |
|
Profaned Capital (x2) |
|||
| Location | Directions | Drops | |
| In a series of hallways with holes in the floor that lead to the toxic swamp underneath. | From the Profaned Capital bonfire, head down the ladder as if you're backtracking to the large room full of Jailers. Once at the bottom, locate the hole in the wall directly behind you and drop through. Head left and make your way to the door of the next building. Be mindful of the Gargoyle as you approach. Once inside, the lizard can be seen waiting in the hallway; however, take care not to fall through the hole in the floor. You can avoid this hole by following the left path. | 169 |
|
| Same area as the lizard mentioned earlier, just before it. | This lizard is found on the way to the one mentioned above. | 169 |
|
Lothric Castle (x2) |
|||
| Location | Directions | Drops | |
| In an alleyway where Hollow Assassins will ambush the further you move into the alley. | Note: If you kill this lizard, the other will despawn upon reloading the area. It is unconfirmed whether this is a bug or deliberate. From the Dragon Barracks bonfire, make your way up the stairs to where the Lothric Wyverns would blanket the bridge in fires. Instead of crossing the bridge, drop off on the right side of it. Be mindful of the two Pus of Man down here as you reach for the door out. The crystal lizard can be found in the alley just beyond that door; however, it's highly recommended to steer the lizard into the nearby wall to avoid triggering the ambushes down the alleyway. |
232 |
|
| Past where you would attack the green Lothric Wyvern's foot to root out its Pus of Man. | Note: If you kill this lizard, the other will despawn upon reloading the area. It is unconfirmed whether this is a bug or deliberate. From the Dragon Barracks bonfire, progress forward until you're able to reach the first entrance past where the green Lothric Wyvern would blow fire. You'll be in a large, darkened room full of explosive barrels, which the Hollow Soldiers will use to their advantage with firebombs. Take care not to be within the blast radius. The dragon's foot can be reached by climbing the ladder directly to the right upon entry. Instead of going for the foot, take the pathway to the left and go out the door. Follow the path to loop around the building, and you'll find the crystal lizard just beyond the small staircase. |
232 |
|
Grand Archives (x8)(All but one lizard will drop one Twinkling Titanite in addition to what's listed.) |
|||
| Location | Directions | Drops | |
| Located on the left side of the room at the top of the stairs from where the Crystal Sage first appears. | When facing the Crystal Sage's initial spawn point upon entering the archives, there will be staircases to your left. The crystal lizard will be at the top. | 277 |
Crystal Gem x1 |
| In the dark room past the first large vat of wax. | Proceed until you find the first large vat of wax you can dunk your head into. To the right will be a study room shrouded in darkness. In this room, two crystal lizards can be spotted slightly to your right: One near the base of a mobile staircase and another to the right of it. | 277 |
Chaos Gem x1 |
| In the same room as the one mentioned just earlier. | This lizard is just to the right of the one mentioned above. | 277 |
|
| On the third floor past the darkened room to the left. | As soon as you exit the dark room, the lizard can be spotted to your left. | 277 |
|
| On top of bookshelves to the right of the kickable ladder past the dark room. | Note: This is the only one that doesn't give a Twinkling Titanite. Upon exiting the darkened room, there is a kickable ladder directly in front of you. From here, look to your right and you can spot the crystal lizard waiting on top of some bookshelves. There are two ways to kill this lizard: You can angle yourself from the top of the kickable ladder, and snipe it with projectiles of your choosing, or carry on throughout the level until you reach the large bridge where the Crystal Sage spawns if you didn't kill it the first two encounters. A part of the bridge's baluster is broken, which will allow you to drop onto the same bookshelves as the lizard. |
277 |
|
| On the sixth and highest floor in the archives just before reaching the roofs section of this area. | From the first elevator shortcut for this area, travel up the stairs and go past the three Scholars to locate another set of stairs. The lizard will be located at the very top of this staircase. It's recommended to dunk your head in wax before engaging, simply due to the crystal lizard's tendency to run towards the cursed bookshelves. |
277 |
Refined Gem x1 |
| On the rooftops close to where the second Gargoyle appears. | Upon entering the roof section of this level, progress forward until you run into a Gargoyle standing out in the open on the rooftops. It will be the correct Gargoyle if you're able to spot Corvians on a lower level nearby. Both of the remaining crystal lizards are close by to the left when traveling up the roofing. |
277 |
Sharp Gem x1 |
| Right next to the lizard mentioned above. | -- |
277 |
Heavy Gem x1 |
Archdragon Peak (x1) |
|||
| Location | Directions | Drops | |
| Inside the ruins just before the second Ancient Wyvern attacks. | From the Dragon-Kin Mausoleum bonfire, progress forward until you meet the first giant Serpent-man. Cross the bridge behind it to reach the ruins, and the lizard can be found inside. | 281 |
|
Crystal Lizard DLC Locations
The Painted World of Ariandel (x7) |
|||
| Location | Directions | Drops | |
| Inside the ruins tower with Millwood Archers | From the Snowfield bonfire, progress until your first encounter with the Gravetender Greatwolf. Make note of the cliff it leaped from, and travel down the path underneath that cliff. You'll eventually come across an open area with ruins and Millwood Knights scattered about. The tower should be visible in the distance. Inside that tower, make your way up the stairs, and climb the first ladder. At the top, there is a staircase to your left that will spiral back down. You will encounter the crystal lizard on the way down this staircase. | 373 |
|
| Along the mountainside that's left of the long bridge leading to Ariandel Chapel. | From the Rope Bridge Cave bonfire, look for the ladder directly to the left of the long, rope bridge. Descend this ladder, and continue the path to find the crystal lizard. | 373 |
|
| On a side of the building that houses the Corvian Settlement bonfire. | From the Corvian Settlement bonfire, exit the house and make your way across the short bridge. Circle around the house on your left, and follow the path until you bump into the second Corvian Settler who will shove you. To your left is an area you can jump to and will lead you back to the bonfire if you drop through the hole in the house's wall. Jump to it but don't fall through the small hole. Instead, head right towards the boxes and barrels littered in front of a gap in a different wall. To your right will be a vomiting Corvian Settler. To your left is a narrow walkway leading to the crystal lizard. | 373 |
|
| On the second skyway with a Crow Talon Corvian Knight dangling above it. | From the Corvian Settlement bonfire, exit the house and cross the short bridge. Follow the direction most of the Corvian Settlers are trudging towards. As soon as you spot the Crow Quill Corvian Knight slaughtering its kin, search your right for the narrow alleyway in between the houses. Travel down this path and climb up the ladder past the vomiting Corvian Settler. Mind the Corvian mages up here on the roofs as you make your way across to the second tower housing another ladder. Climb this ladder to reach the first skyway. The second skyway will be to your right. Beware of the Corvian Knight dropping down to block you as you chase the lizard here. | 373 |
|
| Hidden behind an illusory wall in the Giant Fly-infested basement of Ariandel Chapel. | This illusory wall is somewhat near the corpse holding Sir Vilhelm's set. As soon as you step through the doorway, the crystal lizard will be directly to your right. Be mindful of the numerous Giant Flies spitting maggots at you in this area. It is recommended to equip a torch in your off-hand to prevent continuous bleed build-up from those maggots. | 373 |
|
| Beyond the same illusory wall as the lizard mentioned above. | This lizard is found further down the stairs from the one mentioned above. It will most likely be the first lizard you will notice upon revealing the hidden door. | 373 |
|
| On the way down to the Depths of the Painting bonfire. | You must be on the side of the long bridge closest to Ariandel Chapel, and it must be broken to reach this lizard. If you've already opened the front door to Ariandel Chapel, you can come from its bonfire to descend the broken bridge. Otherwise, the Rope Bridge Cave bonfire is just fine. Either way, swipe at the bridge to break it and descend. Tread carefully as you follow the roots down. You will find the lizard near two Farron Followers halfway down this path. You'll know you're close if you notice a Millwood Archer trying to shoot you off of the roots. |
373 |
|
The Ringed City (x4) |
|||
| Location | Directions | Drops | |
| On a lower ledge near the third safe zone that protects you from the Judicator's archer spirits. | From the Mausoleum Lookout bonfire, make haste to the third safe zone. When facing the Judicator, peer over the edge to your right to find a lower ledge you can land on. Drop down and the lizard will be waiting next to the wall. | ?? | ?? |
| Near the skyway past a docile Locust Preacher after climbing a long ladder. | From the Ringed City Streets bonfire, head out towards the swampy streets. Backtrack towards the large staircase where multiple Harald Legion Knights would spawn, but instead of going up the stairs, make your way to the right of it. Here you will find three Hollow Clerics, one of which will spin towards you in an attempt to ram you over. Climb the ladder near them, and look to your left as you walk up the stairs to find the lizard at the edge of the sky bridge. Beware of the Ringed Knights on the opposite end of the bridge. It's recommended to equip the Silvercat Ring and steer the lizard off the edge. It will sustain damage from the fall, and you can then finish it off with a plunging attack. | ?? | ?? |
| Near the Shared Grave bonfire inside the tower Darkeater Midir perches atop. | You'll reach this tower after getting past the first encounter with Midir. Once inside, the crystal lizard can be spotted up the stairs. It's not recommended to travel up, as part of the staircase will cave in just before you can reach the lizard. Instead, head right down the stairs and search for the lower platform you can land on at the end of the path. Continue onward until you come across a series of hallways with reanimating Skeletons throughout. At the end of these hallways will be the crystal lizard. Alternatively, you can come from the Shared Grave bonfire and backtrack down the stairs. The lizard will attempt to escape by running over the same loose bit of flooring, which will still cave in if you step on it. However, you can jump the gap from this angle and still reach the lizard. |
?? |
|
| Inside the building right after Midir's second encounter. | From the Shared Grave bonfire, make your way across the long bridge where Midir would reappear a second time. Once inside the next building, look to your left to find a staircase. The lizard is halfway up this staircase. |
?? | ?? |
 Anonymous
- Anonymous
Jumping from the leaning tree at firelink shrine onto the roof still works in 2023. Removing armour and weapons before trying the jump worked well for me.
- Anonymous
- Anonymous
- Anonymous
- Anonymous
Extremely timid, don't sneak up on this lil' dude, but so passive that the only way they can hurt you is on accident, very space efficient too.
I give 'em a pet score of 8/10 don't scare the lil' man
- Anonymous
I feel bad killing them for some shitty gem I will never use :(
- Anonymous
They do respawn if you happen to miss them, but for the life of me I can't figure out how it is triggered. I know because I missed the first one in the undead settlement, but I came back to the game a bit later, and it respawned?
- Anonymous
You don't have to hurt these little dudes! You can buy unlimited scales and twinkling late game.
- Anonymous
you can kill both crystal lizards in lothric castle that drop the 2 twinkling titanite, you just need to both of them on the same spawn.
- Anonymous
Most people oh he’s so cute
Me just wait till you see what he’ll grow into
- Anonymous
- Anonymous
if from software makes a plushie of this guy i would definitely buy one
- Anonymous
- Anonymous
I and to pet it’s nearly nonexistent head it’s just adorable
- Anonymous
- Anonymous
The second lizard in the tunnel leading to horace can be made to reliably glitch through the wall. Sprint past it hugging the left wall so it runs straight at the right wall. It will clip through and fall out of bounds to its death
- Anonymous
I also managed to find one in some barrels in undeadburg, its in the tower leading up to the taurus demon fight on the same floor as the fog gate in the far right barrel
- Anonymous
- Anonymous
Oh my god you can actually hit them, unlike in ds2, thank you miyazaki
- Anonymous
because of they're high defense i often turn into star platinum when perusing them
- Anonymous
Easiest enemies in the game. They never even got a hit on me
- Anonymous
Remember DeS, and how you would literally only have one chance to kill these guys per NG cycle, and that they spawned in groups so you could only get 1-2 of them
- Anonymous
- Anonymous
These guys are suicidal. The amount of times they've ran off the edge of the map... hard life
- Anonymous
Anyone notice these guys can roll? One was right after the Crystal Sage fight and it literally tucked and rolled like a Roley-poley/pill bug down the path. It was the cutest thing!
- Anonymous
- Anonymous
Fun fact: Crystal Lizards can actually deal damage to you if they fall on you. I was chasing one in Ariandel (the one in the room that leads outside to Pyromancer's Parting Flame), but it glitched out, ran up one of the left walls, and fell on me, stunning me for a second and dealing a small amount of damage.
- Anonymous
Shouldn't die if jumping down a cliff or not jumping down a cliff at all. If they run away from us they want to live. Jumping down a cliff goes against that. Reminds me each time that I play a game. When they lemming themselves for no reason and then the titanite is teleported into my pocket.
- Anonymous
Wiki says that "if one does get away, a reload will respawn it.", but I think it's not necessary. It got away from me, but I didn't reloaded the save, instead I simply go to rest at bonfire. An it was back :-) So, don't need to play in save reloading shenanigan, you can just simply go to rest at bonfire and it will be back, like normal enemies (until killed) :-)
- Anonymous
Fun little trick: shooting a crystal lizard with a great arrow will cause it to flip over on its back side for a moment, making it easy to loose two shots in succession to quickly finish them off. Alternatively, Millwood Greatbow's skill will flip the crystal lizard over when the arrow connects, and if aimed properly, the great arrow's following explosion should finish them off, or flip them over again if they don't die. This method proves extremely useful for catching crystal lizards that like to run before you even get within range, or for ones that lead you to traps. I always use this method for the crystal lizard in Irithyll that leads you into an ambush by a Wretch, since it starts running before you even get within melee range.
BTW: the second crystal lizard in the Ringed City (on the bridge leading to Lapp's rotunda, guarded by two Ringed Knights) drops Twinkling Titanite x2. I know the first one (beneath the bridge of summoned archers) drops Titanite Scale, but I don't remember how many. Likewise, the fourth drops Twinkling Titanite, but I can't recall the amount :(
- Anonymous
It should be mentioned that if a lizard escapes, you can just quit to the title screen, and the lizard will respawn, but not any of the enemies you've killed. Saves the hassle of having to go back to a bonfire and fighting the enemies again on the way. This can also be used to manipulate which direction the lizard will go, depending on where you were before quitting.
- Anonymous
I feel so bad killing these little guys, they're so cute :(
- Anonymous
THEY ARE WEAK TO LIGHTNING!!!!!!!!!!!! Update this please. It also staggers them really well.
This wiki page hadn't been updated in quite a while, so I took the liberty of reformatting the layout of the entire table to include more details on where these lizards were found in addition to what they dropped. I will be covering the DLC areas soon, as I need to re-confirm their drops, but if anyone already has information on exactly what each DLC lizard dropped, you're welcome to share.
- Anonymous
So I'm not sure what's going on, but I actually got the loot from a few lizards without even touching them in the first place ; mostly in the DLC. They had an escape plan that involved falling to their death somehow. And for some reasons, the game acts as if YOU killed them and you get the reward. Quite sure you would get nothing this way in DS2 ( not sure about DS3, didn't see any try jumping off a cliff to evade you )...
anyone know how many are in the dlc? fextra hasnt seemed to be updated on either this or the twinkling titanite page...
- Anonymous
So at Lothric Castle past the Dragon Barracks there are actually 2 crystal lizards that appear. One on the set of stairs leading to the thief ambush area and the other appears on the ledge below the golden dragon that can be reached by going out the door opposite the entry way that is blocked by the golden dragon's foot in the darkened room. You can actually see both simultaneously by standing on the ledge before you drop down to get the life ring +2 in NG+.Now the odd part about these 2 lizards is they seem to share both the same loot and life. So if you kill one, the other will not respawn no matter how you reset the area. What's strange is all the guides I've looked at only account for 1 lizard in the area, which is true in a sense, except you can clearly see both lizards in the respective spots at the same time. Now the only thing I have yet to try is killing them both by bow from the spot where each are readily visible. If anyone knows what's going on with these two feel free to fill me in or update the page with the correct info.
- Anonymous
- Anonymous
resting at a bonfire does not appear to respawn them for me. I think an acutal game reset is required.
- Anonymous
there's one at firelink shrine behind the building, you can see him easily if you are on the roof of firelink shrine
There's a crystal lizard at the back of Firelink accessed by going around the the roof
- Anonymous
If you go behind Firelink shrine (using the jump glitch to get the estas shard and silver serpent ring early) there is a small crystal lizard that drops a twinkling titanite!
- Anonymous
I went and summoned a sun bro, but noticed them both too late. They skittered off and dissapeared. But when I go back to my bonfire, they dont respawn.
- Anonymous
I found a stone crystal lizard in archdragon peak that only dropped souls. Is there anything special with it?
- Anonymous
I've watched them disappear with no damage taken and not come back, is this new for this game?
- Anonymous
if a lizard gets away just sucide and go back . lizard will be back
- Anonymous
only got 1 hit on a lizard then it disapeared tried to reset with bonefire but it wont come back. are they gone from the game if they escape damaged?
- Anonymous
I started with depraved and the soul burial gift so I didn't have much to fight with. After leading it around the starting area for awhile I got to the cliff and tried to bait a roll. He never came far enough out of the cavern to get to the cliff, however, so I managed to kite around at the edge of his aggro range to bait out the belly flops. When he lands you can heavy attack the face and roll away again. He took way more damage from the club than I expected. Was lucky enough to get a sacred chime from the hollows first, so between using that and the starting estus flasks I kept my health topped up and had little worry. Killed it and thought I was doing pretty darn good until the ludex.
- Anonymous
Was it just me, or were the normal lizards extremely easy to kill? I don't think I ever missed a single one I went after, and they never seemed to lead into any traps or ambushes. I'm happy to get the loot, and it was nice that they weren't lemmings like they were is Dark Souls 2, but I missed the challenge is all.
- Anonymous
Honestly I wouldn't go for this guy if you've just started a new character, at least if you're fairly new to Dark Souls games, as he can easily take you by surprise and kill you in 2 hits. I personally waited a little bit, cleared out the first few areas of the High Wall of Lothric, and got my character leveled up a little bit before I went back to take him on. Or if you feel like you can do it, you can try and go for the guy when you start off and take the advice of either the person who talked about 2 handing your weapon and dodging, or the person who explained how you can lure the lizard to commit suicide. It's pretty rewarding really early on, but I'd make sure you defeated Iudex first, just in case you happen to die to him twice and you accidentally lose the souls you get from the lizard.
- Anonymous
The big lizard in Cathedral of the deep rolled trough a wall and died
- Anonymous
2 hand your weapon, dodge its telegraphed attacks and get 1or 2 hits in, dont get greedy.watch out for its tricky little move where it does a little twist like a snake, pauses, then swipes without warning. watch for it to twist then dodge right after the pause.
- Anonymous
You can simply lure the starting area lizard to the first bonfire, where if you get him on the small path leading to it, and just roll past during his attack he will usually fall off, and you still get the reward.
https://www.youtube.com/watch?v=uRI_xd2acagfight time 12:10 with Crystal Lizard.Rolled like a demon aroun him xD (he has safe zone at left back side, except his crystal aoe when he hit ground with chest, should to avoid this.)Besides, he could kill me barely with two punches. But i did it, awesome feelings.
- Anonymous
I've recently missed one of the tiny ones, and apparently its not respawning. Someone knows if it'll eventually respawn somehow or is it just gone?
- Anonymous
The one at the beginning took only like 17 dmg from my magic arrows. They mabey have some magic resistance? Would be great if someone could confirm it.
- Anonymous
Did anyone else try like hell to get the tail? It was just so tempting. I'm surprised it didn't eventually pop off. I don't know. Maybe you cant get the tail.
- Anonymous
Found 3 crystal lizards in the same place chased them killed none after bonfire reset they are not there :'(((
- Anonymous
- Anonymous
- Anonymous
You should probably make two pages: one for normal Crystal Lizards, and another one for Monstrous Crystal Lizards.
- Anonymous
I laughed when I first saw the new crystal lizard; I loved the idea of these creatures fighting back. It would have been funny if we see a little crystal lizard in the beginning area, it runs, we instinctively chase it, and then we get ambushed by its "mother" waiting around the corner.
- Anonymous
I decided to go and find the video I saw of the Lizard and screenshot it to get the lizard on here.Here is the video I got the picture from: https://www.youtube.com/watch?v=jgvx31T9to8
- Anonymous

I was chasing it,then I fell down and it fell on my head. GOD DAMN IT I TOOK DAMAGE FROM A CRYSTAL LIZARD I MUST KILL MYSELF
11
+10
-1